Introduction
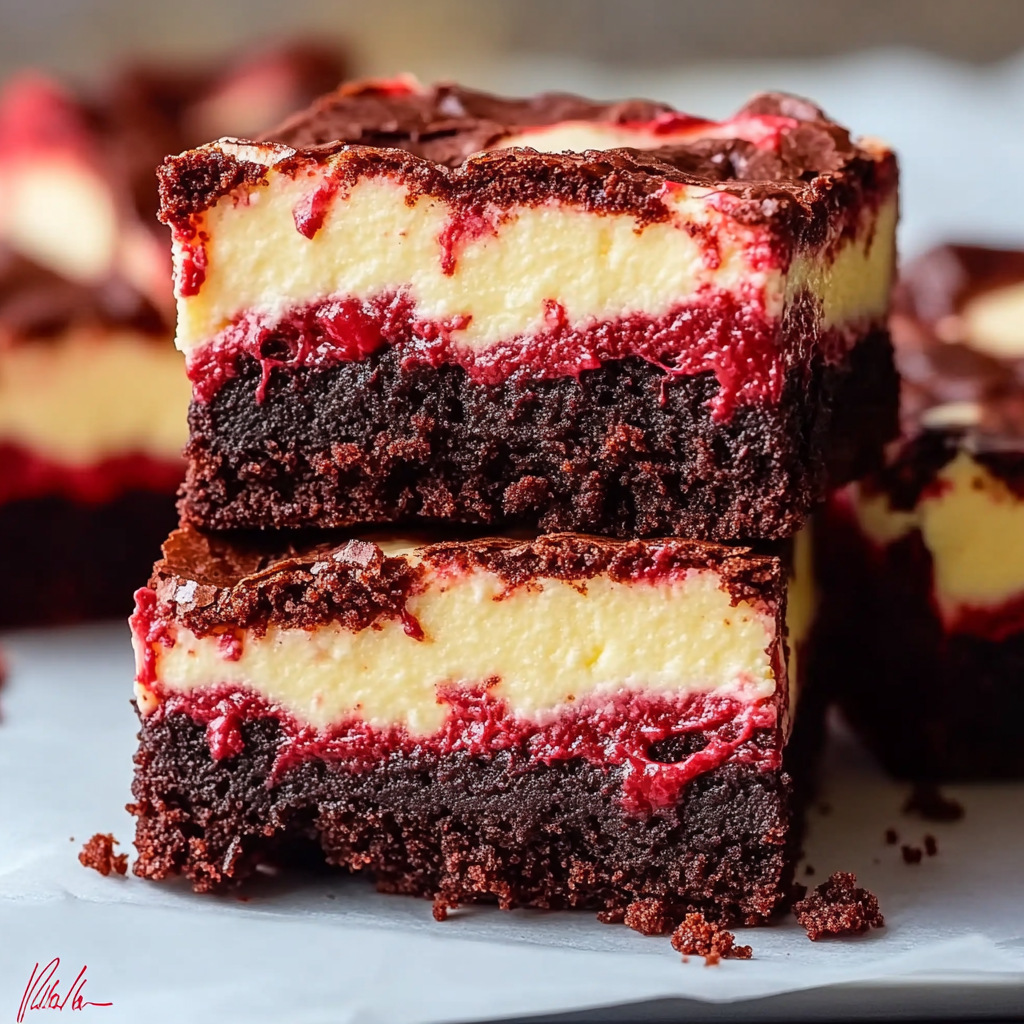
Hey there! Are you ready for a decadent treat that combines the richness of red velvet, the creaminess of cheesecake, and the fudginess of brownies? Well, look no further because I have the perfect recipe for you – Decadent Red Velvet Cheesecake Brownies! These indulgent delights are a crowd-pleaser and will satisfy even the most demanding sweet tooth. Prepare yourself for a heavenly combination of flavors and textures that will leave you craving for more.
Why You’ll Love This
I make these Decadent Red Velvet Cheesecake Brownies whenever I want to impress my guests or simply treat myself to a little slice of heaven. The red velvet layer adds a touch of elegance, the cheesecake layer provides a creamy tanginess, and the brownie layer brings the perfect amount of chocolatey goodness. My family goes crazy for these brownies because they are the ultimate indulgence – moist, rich, and utterly irresistible.

Ingredients
For the red velvet layer:
– 1 and ½ cups all-purpose flour
– 1 teaspoon unsweetened cocoa powder
– 1/2 teaspoon baking powder
– 1/4 teaspoon salt
– 1/2 cup unsalted butter, softened
– 1 cup granulated sugar
– 2 large eggs
– 1 teaspoon vanilla extract
– 1 tablespoon red food coloring
– 1/2 cup buttermilk
For the cheesecake layer:
– 8 ounces cream cheese, softened
– 1/4 cup granulated sugar
– 1 large egg
– 1/2 teaspoon vanilla extract
For the brownie layer:
– 1 cup unsalted butter, melted
– 2 cups granulated sugar
– 4 large eggs
– 1 teaspoon vanilla extract
– 1 cup all-purpose flour
– 1/2 cup unsweetened cocoa powder
– 1/2 teaspoon salt
Directions
1. Preheat your oven to 350°F (175°C) and line a 9×13-inch baking dish with parchment paper, leaving some overhang for easy removal later.
2. In a medium bowl, whisk together the flour, cocoa powder, baking powder, and salt for the red velvet layer.
3. In a separate large bowl, cream together the softened butter and sugar until light and fluffy. Add the eggs, one at a time, beating well after each addition. Stir in the vanilla extract and red food coloring until well combined.
4. Gradually add the dry ingredients to the wet ingredients, alternating with the buttermilk. Begin and end with the dry ingredients, mixing just until combined. Be careful not to overmix.
5. Spread the red velvet batter evenly into the prepared baking dish.
6. In another bowl, beat the softened cream cheese and sugar until smooth for the cheesecake layer. Add the egg and vanilla extract, and beat until well incorporated.
7. Gently spread the cheesecake batter over the red velvet layer in the baking dish.
8. Now, let’s move on to the brownie layer. In a large mixing bowl, combine the melted butter, sugar, eggs, and vanilla extract. Mix until well blended.
9. Gradually add the flour, cocoa powder, and salt to the brownie batter. Mix until just combined.
10. Pour the brownie batter over the cheesecake layer, spreading it evenly.
11. Use a knife or a skewer to create swirls by gently running it through the layers, creating a marbled effect.
12. Bake in the preheated oven for 35-40 minutes or until a toothpick inserted in the center comes out with a few crumbs. Be careful not to overbake.
13. Once done, remove the baking dish from the oven and let the brownies cool completely in the dish.
14. Once cooled, use the parchment paper overhang to lift the brownies out of the dish. Cut into squares and serve.
Notes
– You can add a handful of chocolate chips to the brownie batter for an extra burst of chocolatey goodness.
– If you don’t have buttermilk on hand, you can make a homemade substitute by mixing 1/2 cup milk with 1/2 tablespoon of lemon juice or white vinegar. Let it sit for 5 minutes before using.

Variations
I love experimenting with different flavors and textures, and these brownies are the perfect canvas for creativity. Here are a few variations I’ve tried:
– Mint Chocolate: Add 1/2 teaspoon of peppermint extract to the brownie batter for a refreshing twist.
– Nutella Swirl: Swirl some Nutella into the brownie batter before baking for a gooey, chocolate-hazelnut surprise.
– Peanut Butter Lover’s: Swirl creamy peanut butter into the cheesecake layer for a decadent combination of flavors.
Equipment
You’ll need the following equipment to make these Decadent Red Velvet Cheesecake Brownies:
– 9×13-inch baking dish
– Parchment paper
– Mixing bowls
– Electric mixer
– Knife or skewer for swirling
Storage
Though honestly, in my house, these brownies never last more than a day! However, if you have any leftovers, store them in an airtight container at room temperature for up to 3 days. You can also refrigerate them for a longer shelf life, but let them come to room temperature before serving.
Serving Suggestions
I personally love serving these Decadent Red Velvet Cheesecake Brownies with a generous scoop of vanilla ice cream and a drizzle of chocolate sauce. The cold and creamy ice cream pairs perfectly with the warm and fudgy brownies. Trust me, it’s a match made in dessert heaven! Feel free to get creative with your toppings and serve them however you like.
Pro Tips
– Make sure to use softened butter for the best texture in all the layers of the brownies.
– Don’t overmix the batter, especially when combining the dry and wet ingredients. Overmixing can result in a dense and tough texture.
– When swirling the layers, don’t overdo it. A few gentle swirls are enough to create a beautiful marbled effect.
– If you want to save some time, you can use a store-bought red velvet cake mix as a shortcut. Just follow the package instructions for the cake batter and proceed with the cheesecake and brownie layers as mentioned in this recipe.
FAQ
Q: Can I freeze these brownies?
A: Absolutely! These brownies freeze well. Once they have cooled completely, wrap them tightly in plastic wrap or aluminum foil, and place them in a freezer-safe container or bag. They can be stored in the freezer for up to 3 months. Thaw them at room temperature before enjoying.
Q: Can I use a different food coloring?
A: Yes, you can use any food coloring of your choice. Gel food coloring works best as it provides vibrant colors without affecting the texture of the batter.
Q: Can I use low-fat cream cheese?
A: While you can use low-fat cream cheese, keep in mind that it may affect the texture and flavor of the cheesecake layer. Full-fat cream cheese provides a creamier and richer taste.
Q: Can I use a different size baking dish?
A: If you use a smaller baking dish, the layers may be thicker, and the baking time may need to be adjusted. If you use a larger baking dish, the layers may be thinner, and the baking time may be slightly reduced. Keep an eye on the brownies and adjust the baking time accordingly.
So there you have it – the recipe for these heavenly Decadent Red Velvet Cheesecake Brownies. I hope you enjoy making and indulging in these delightful treats as much as I do. Remember, baking is all about having fun and savoring the delicious results. Happy baking!
Decadent Red Velvet Cheesecake Brownies
Indulge in the perfect combination of red velvet, cheesecake, and brownie layers with these Decadent Red Velvet Cheesecake Brownies. Moist, rich, and utterly irresistible, these brownies are a crowd-pleasing treat that will satisfy any sweet tooth.
Ingredients
- 1 and ½ cups all-purpose flour
- 1 teaspoon unsweetened cocoa powder
- 1/2 teaspoon baking powder
- 1/4 teaspoon salt
- 1/2 cup unsalted butter, softened
- 1 cup granulated sugar
- 2 large eggs
- 1 teaspoon vanilla extract
- 1 tablespoon red food coloring
- 1/2 cup buttermilk
- 8 ounces cream cheese, softened
- 1/4 cup granulated sugar
- 1 large egg
- 1/2 teaspoon vanilla extract
- 1 cup unsalted butter, melted
- 2 cups granulated sugar
- 4 large eggs
- 1 cup all-purpose flour
- 1/2 cup unsweetened cocoa powder
- 1/2 teaspoon salt
Directions
-
Preheat your oven to 350°F (175°C) and line a 9×13-inch baking dish with parchment paper, leaving some overhang for easy removal later.
-
In a medium bowl, whisk together the flour, cocoa powder, baking powder, and salt for the red velvet layer.
-
In a separate large bowl, cream together the softened butter and sugar until light and fluffy. Add the eggs, one at a time, beating well after each addition. Stir in the vanilla extract and red food coloring until well combined.
-
Gradually add the dry ingredients to the wet ingredients, alternating with the buttermilk. Begin and end with the dry ingredients, mixing just until combined. Be careful not to overmix.
-
Spread the red velvet batter evenly into the prepared baking dish.
-
In another bowl, beat the softened cream cheese and sugar until smooth for the cheesecake layer. Add the egg and vanilla extract, and beat until well incorporated.
-
Gently spread the cheesecake batter over the red velvet layer in the baking dish.
-
In a large mixing bowl, combine the melted butter, sugar, eggs, and vanilla extract for the brownie layer. Mix until well blended.
-
Gradually add the flour, cocoa powder, and salt to the brownie batter. Mix until just combined.
-
Pour the brownie batter over the cheesecake layer, spreading it evenly.
-
Use a knife or a skewer to create swirls by gently running it through the layers, creating a marbled effect.
-
Bake in the preheated oven for 35-40 minutes or until a toothpick inserted in the center comes out with a few crumbs. Be careful not to overbake.
-
Once done, remove the baking dish from the oven and let the brownies cool completely in the dish.
-
Once cooled, use the parchment paper overhang to lift the brownies out of the dish. Cut into squares and serve.